Getting started
To be able to work on a Scolvo Project the following steps should be done (the order is just a proposal, different sequence can be appropriate):
Install the Scolvo VS Code Extension with its dependencies
Acquire Scolvo access
Configure the Scolvo VS Code Extension
Create new Project/Environment
Save the developer license file
Plan your project
Prepare database structure of the components
Update existing script codebase to reflect your project domain
Install the Scolvo VS Code Extension with its dependencies
It is recommended to have Docker Desktop installed and running while working with Scolvo Development Platform. The Docker Desktop can be downloaded and installed from Docker Desktop official site. When working with the Scolvo Development Platform configure at least 4 GB memory resource to Docker to avoid container restart.
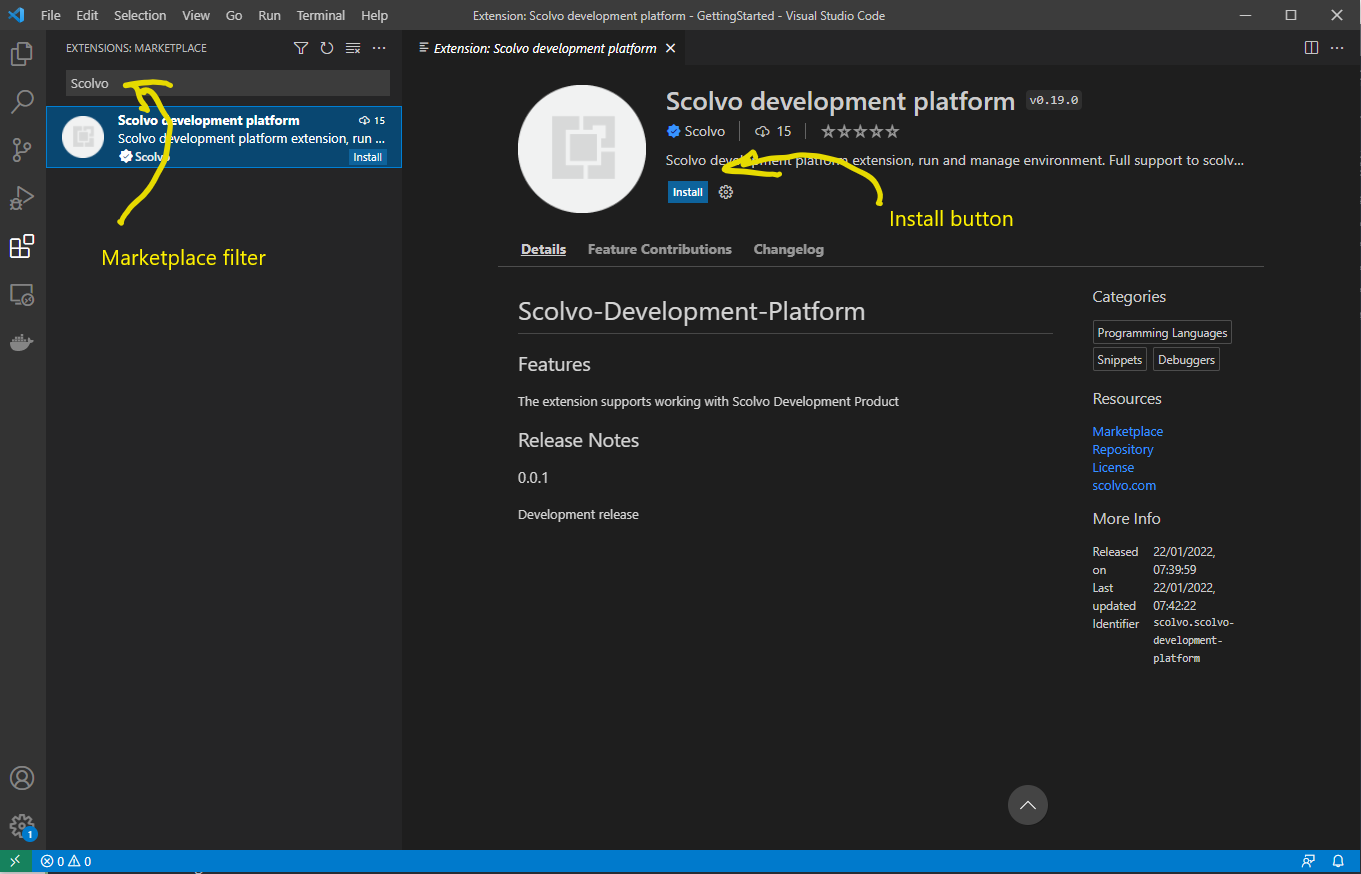
The next step is the installation of Scolvo VS Code Extension: the easiest way to install it is to user the VS Code Extensions view and filter for Scolvo keyword. When the extension is displayed, then activate the Install button. After the installation a restart is required.
Finally, it is recommended to install the Docker extension too, as it is a great help when dealing with Docker containers.
Acquire Scolvo access
If you do not have a Scolvo access yet, then you can register your account on Scolvo Playground. It is required to be able to Start your Environment (used when downloading Framework container images).
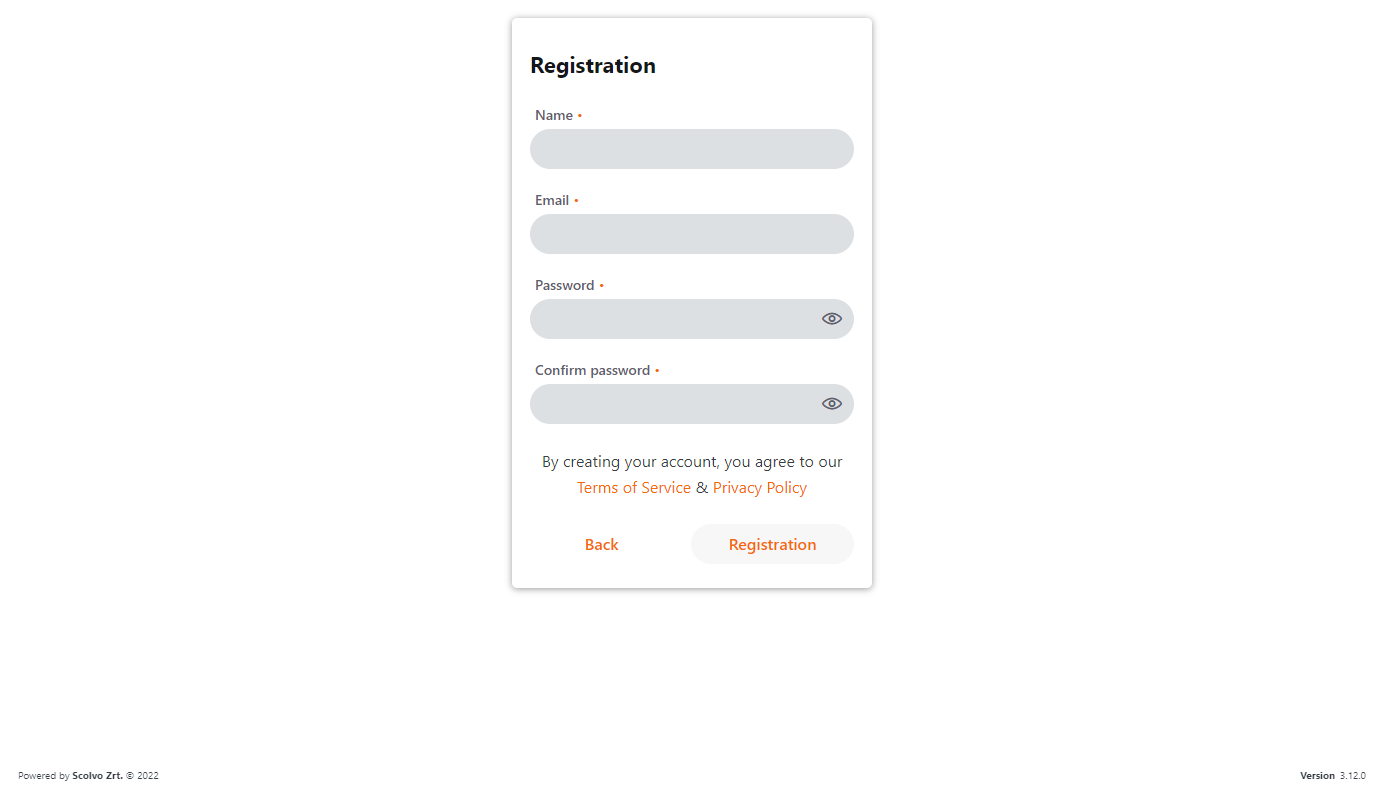
After a successful registration you’ll receive a welcome email containing your developer license.
Configure the Scolvo VS Code Extension
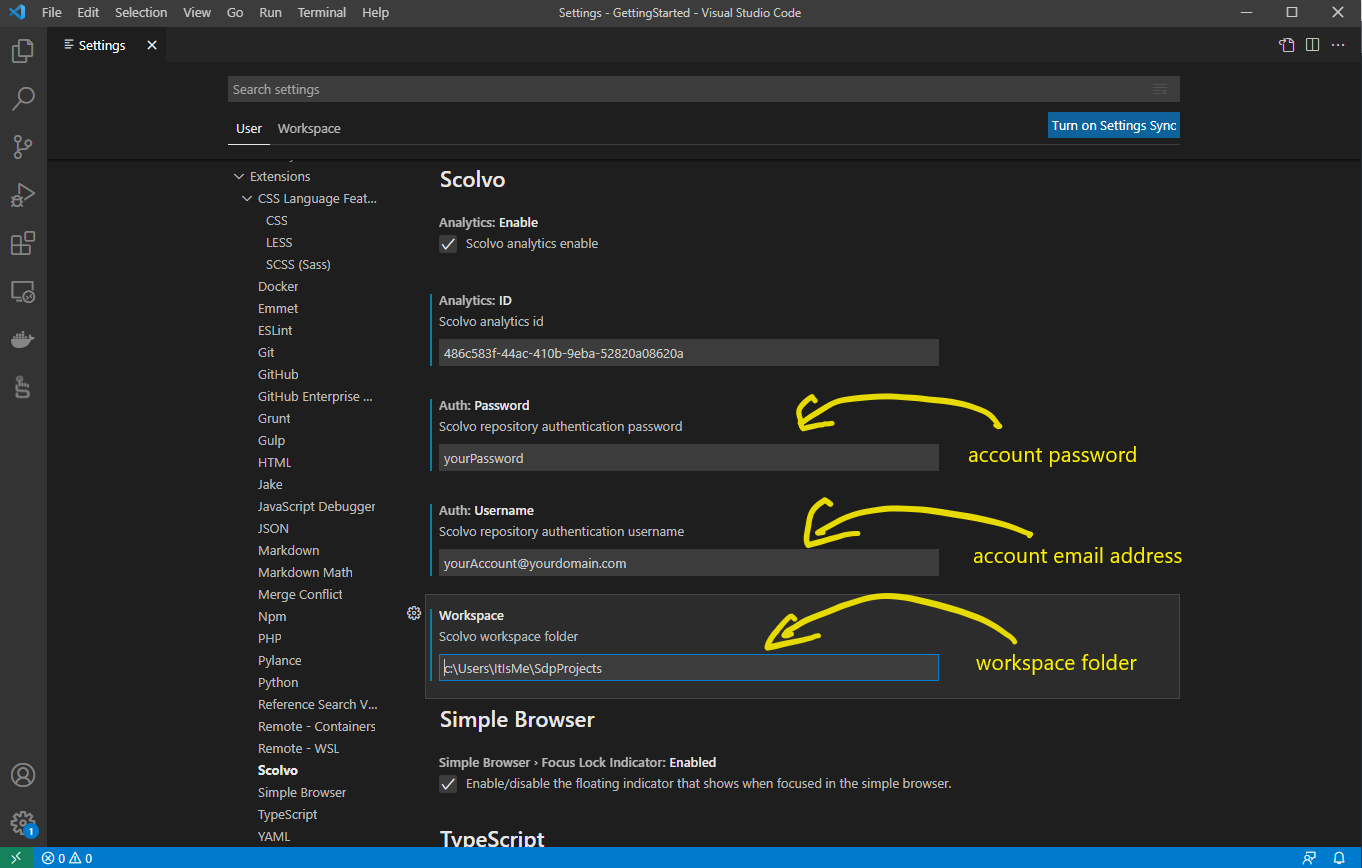
The Scolvo VS Code Extension requires configuration parameters to be set to be able to work correctly. These are:
workspace directory for Scolvo projects,
account username,
and account password.
Open the File/Preferences/Settings window, select Extensions/Scolvo and set the above listed parameters.
If you start an environment without configuration values, then the Extension shows input fiends on the fly (and stores them to the configuration).
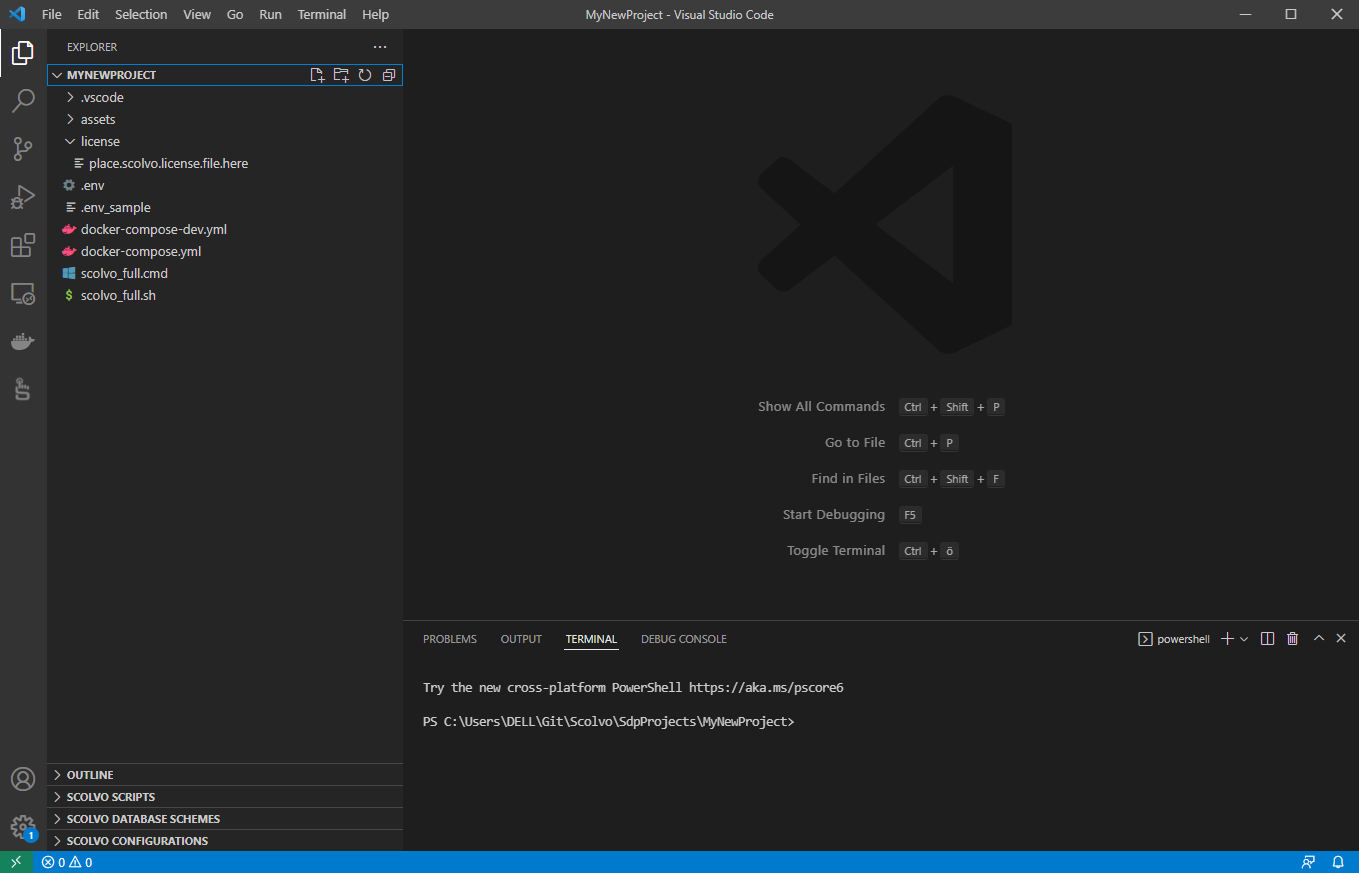
Create new Project/Environment
If you have a Scolvo account, the Scolvo Extension installed, Docker Desktop up and running (and Docker extension installed), then it is time to create your first Scolvo Environment.
Open Scolvo view and select Create Environment button. The extension now asks few parameters for new project creation (project name and default language).
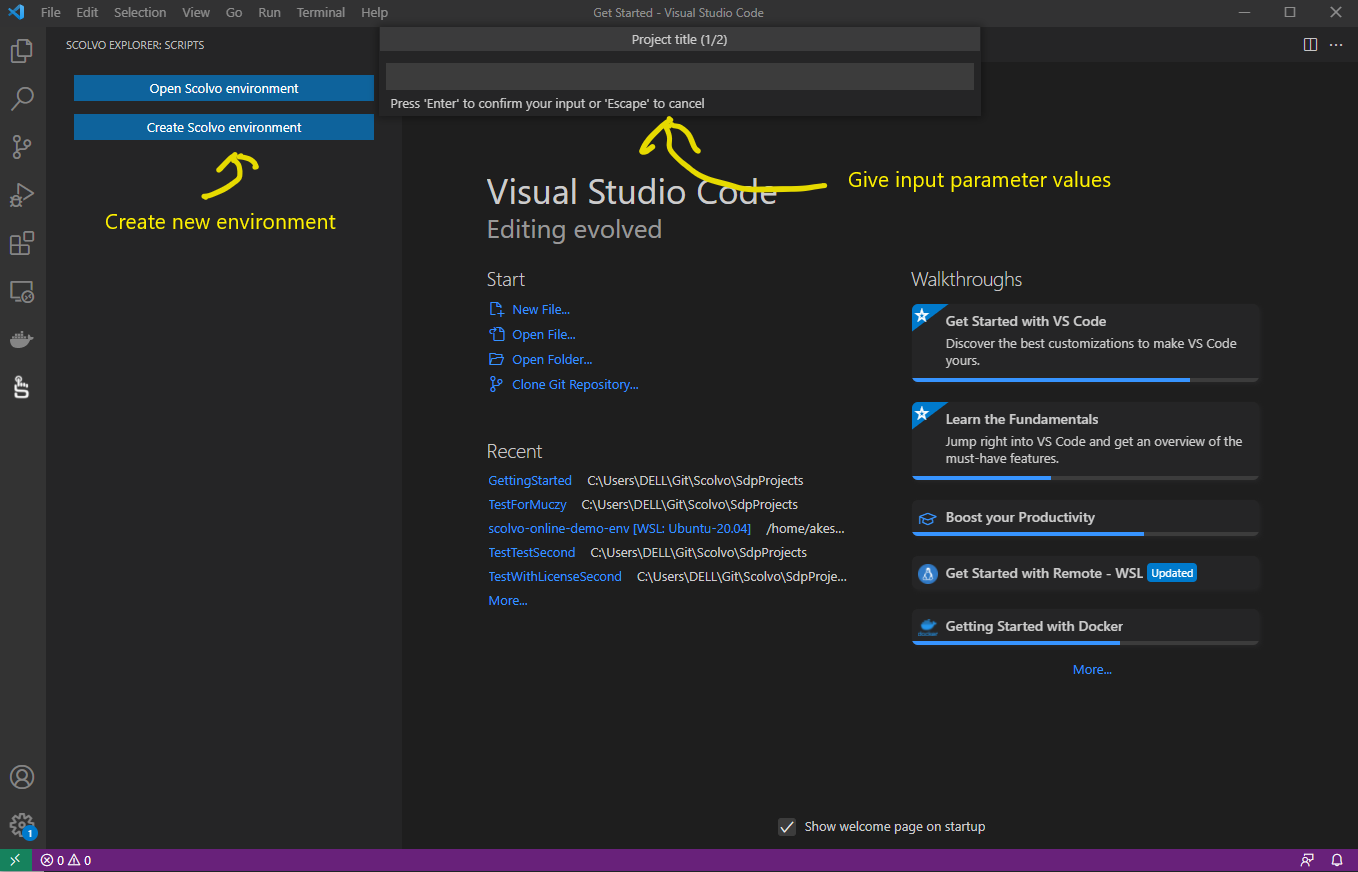
When input parameters are defined for new project, then it downloads content from Scolvo remote services and opens the project.
Note: Actually “en”, “de” and “hu” default languages are supported on Login screens, but this can be extended on demand.
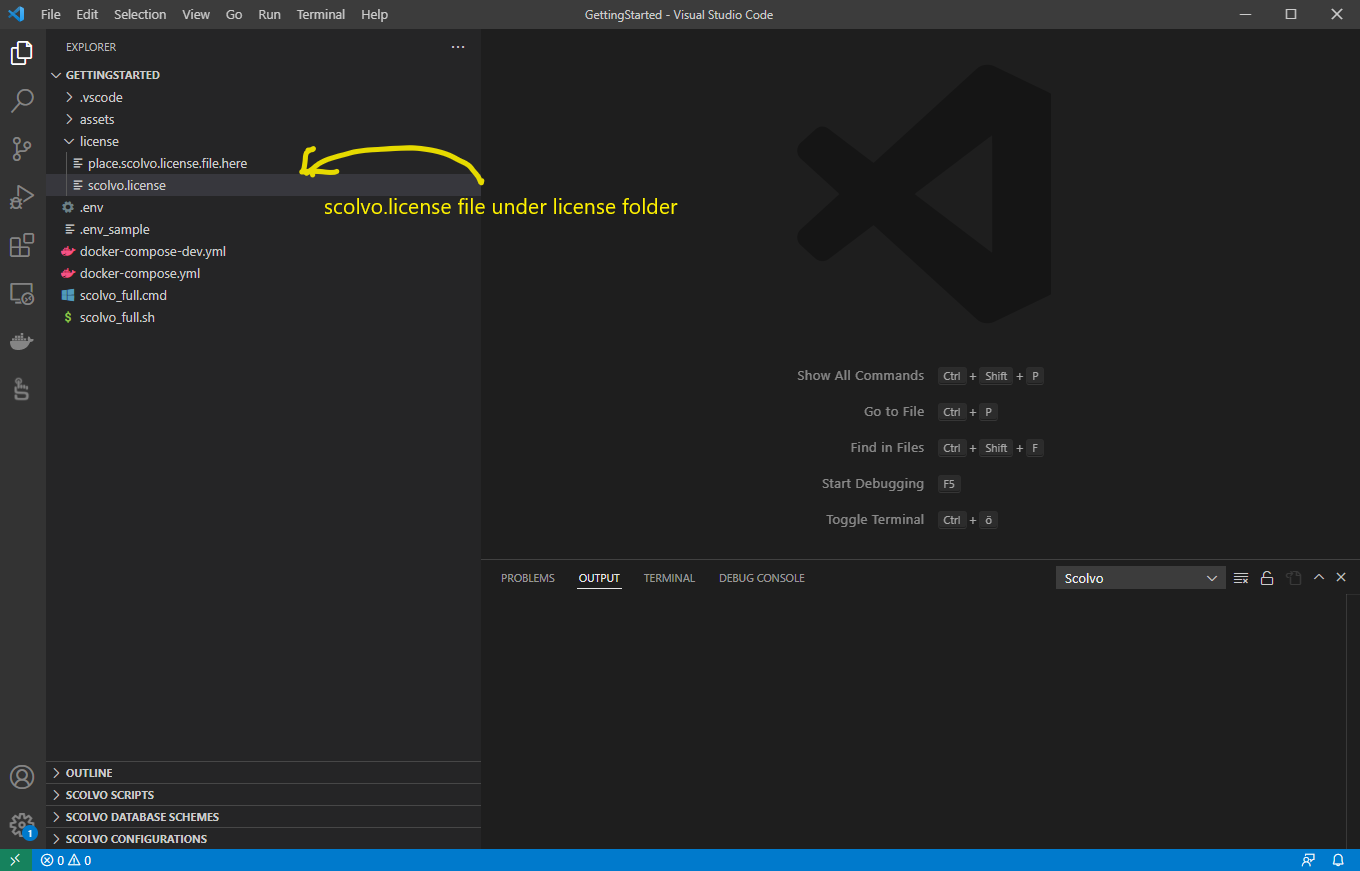
Save the developer license file
After a successful Scolvo account registration you own a developer license file what can be used during local development. This file has to be copied (or the content of this file) to the license folder of your environment with name scolvo.license. This allows you to start the Scolvo environment locally, with maximum 3 users created.
If the license is expired then login to your Scolvo Playground profile and request a new one.
Plan your project
It is recommended to define your project domain model before starting the feature implementation. Think about what data needed where, and what is the minimal data structure for clients (different model can be defined for Mobile and Admin use cases).
Prepare database structure of the components
When planning a solution in Scolvo Development Platform following 3 components require database design:
Backend,
Admin (mhub),
and Mobile (base for webview too)
Tables required by the system are already defined in starter projects in form of Liquibase files. To separate them from the domain of the customer project the have a name 0.xml. It is advised to not change thses, but add new tables or new columns of existing tables in separate files (1.xml, 2.xml, etc). The different files are bound in changeLog.xml files (this name is configured, do not change it), so if you add new change descriptor xml, then do not forget extending them.
Working with Backend data structure
The Backend’s Database is persisted, it also stores the Liquibase version information, therefore sometimes it is necessary to reset your project to wipe out data (and data structure) from database and from authentication database too. (How to reset the project is described in separate section under Environment operation.). The only domain table in the starting content is the user table and its history table with name user_history.
If you extend the structure of the user table then extend the same time its history table with same columns (but do not use not-null constraints)
If you add a new table to the Backend data structure, then create immediately its history table (e.g. bird and bird_history). All backend domain table must have mandatory columns to be added (see the user table example: createdAt, createdBy, updatedAt, updatedBy).
Use type VARCHAR(36) for id columns (uuid() built-in function generates this type), make them PK.
Define indexes for possible filtering and for foreign keys (real FKs are not recommended to use, but the indexes are recommended) to not lose performance when the tables are populated.
Working with Admin data structure
The database of an Admin session is memory based, no need to restart/reset anything when the schema is changed, a logout/login is enough to be done. The relevant files are under the mhub directory. There is a 0.xml defined to separate tables created for the system use (user table for user administration feature). There is no history feature in the client, so these tables are not defined in the database structure, and usually columns storing history related information are not added (createdAt, createdBy, updatedAt, updatedBy).
If you extend the structure of the user table for Backend database and this data is UI relevant, then extend accordingly the definition of the user table in the mhub folder by adding a new change definition file.
If you add a new table to the Admin data structure, then use same types as for the Backend definition of the same table: use VARCHAR(36) for id columns (uuid() built-in function generates this type), make it PK.
Define indexes for possible filtering and for foreign keys (FKs are not defined, but the indexes are required) to not lose performance when the tables are populated.
Transfer only the required data structure and data set to the client to keep database as lightweight and performant as possible.
Working with Mobile data structure
The database of a Mobile session is memory based, no need to restart/reset anything when the schema is changed, a logout/login is enough to be done. The relevant files are under the mobile directory. There is no 0.xml file defined, as there is no predefined structure for mobile apps. According to this behavior new definitions are placed immediately to 1.xml file. There is no history feature in the client, so these tables are not defined in the database structure, and usually columns storing history related information are not added (createdAt, createdBy, updatedAt, updatedBy).
If you add a new table to the Mobile data structure, then use same types as for the Backend definition of the same table: use VARCHAR(36) for id columns (uuid() built-in function generates this type), make it PK.
Define indexes for possible filtering and for foreign keys (FKs are not defined, but the indexes are required) to not lose performance when the tables are populated.
Transfer only required data structure and data set to the client to keep database as lightweight and performant as possible.
Best practice on data types
Define id columns as VARCHAR(36) and you can define unique value using uuid() built-in function.
Define date-time and date values as BIGINT, there are many useful conversion methods defined, check details in Date functions.
You must define boolean types as VARCHAR(8), this type is specially serialized/deserialized by the Framework. When you deal with this value in scripts, then normal boolean values (true, false) can be used.
It is a good habit to use reference id-s to other tables, but usually we do not use FKs. The referring column has a name <other-table-entity-singular>Id (e.g. birdId for referring a bird entity). As it is a FK-like column, an index has to be created for this column.
Update existing script codebase to reflect your project domain
The starting script content of your Scolvo environment reflects to the starting data structure, if you for example extend the structure with a new table, then the script set has to be extended accordingly.
In our example we define a simple new table bird having the following structure:
Backend, bird table definition
id - VARCHAR(36), PK
name - VARCHAR(50), Not null
birthDate - BIGINT, Not null
description - VARCHAR(200)
createdAt - BIGINT, Not null
createdBy - VARCHAR(36), Not null
updatedAt - BIGINT
updatedBy - VARCHAR(36)
- indexes:
id has index, as defined as PK
createdBy should have and index, as it is a userId FK
updatedBy should have and index, as it is a userId FK
Backend, bird_history table definition
id - VARCHAR(36)
name - VARCHAR(50)
birthDate - BIGINT
description - VARCHAR(200)
createdAt - BIGINT
createdBy - VARCHAR(36)
updatedAt - BIGINT
updatedBy - VARCHAR(36)
- indexes:
no indexes are defined, even PK must not be defined
Mobile, bird table definition
id - VARCHAR(36), PK
name - VARCHAR(50), Not null
birthDate - BIGINT, Not null
description - VARCHAR(200)
- index definitions:
id has index, as defined as PK
name should have and index, for filtering
birthDate should have an index, as in our example a range filtering is planned
Backend script change, /backend/TypeDefinitionLifeCycle.scolvo
This script contains database change events, where a strict name pattern is defined for the db operations. You have to create below functions for our example, in case INSERT, UPDATE and DELETE operations are all supported:
onBirdInserting(originId)
onBirdInserted(originId)
onBirdUpdating(originId)
onBirdUpdated(originId)
onBirdDeleting(originId)
onBirdDeleted(originId)
According to the logic of the domain, they can hold code for pre- and post-processing of DB operation (or can be empty if there is no such logic). The row representation can be accesses through $IN.data.map context reference (e.g. var birdDao = $IN.data.map;).
Backend script change, /backend/repository/BirdRepository.scolvo
The repository script is usually a new script for a new entity, it holds the different database select definitions according to the needs. Normally a function is created for data synchronization collecting all relevant rows in appropriate structure (matching the client data structure). For our example we create the BirdRepository.scolvo file containing only one function collecting all birds with all client side defined columns:
1function getBirds() {
2  return select()
3    .selectAs("id")
4    .selectAs("name")
5    .selectAs("birthDate")
6    .selectAs("descripton")
7    .from("bird")
8    .execute();
9}
Backend script change, /backend/DataSync.scolvo
The DataSync scolvo file contains the event definition of onDataSync(userId, deviceType), what is called, when a successful login is processed in one of the clients. In this case the Backend is requested to collect all relevant data (as minimal as possible) to be sent to the client database. Here you can make decisions based on the user role and the client type. In our case we can differentiate between pre-defined role “superUser”, a usually defined role “administrator” and the domain specific “zooKeeper” role. Do not forget to import new scolvo file before using its functions! Here is the extended function:
 1import {
 2  /common/Roles,
 3  /backend/repository/UserRepository,
 4  /backend/repository/BirdRepository
 5}
 6
 7function onDataSync(userId, deviceType) {
 8  info("onDataSync for " + userId + ", deviceType: '" + deviceType + "'");
 9  if (userId == "superUser") {
10    if (deviceType == "MHUB") {
11      return dataSyncByAdministrator();
12    }
13    return [];
14  }
15
16  var user = getUserById(userId);
17  if (user.role == roleAdministrator && deviceType == "MHUB") {
18    return dataSyncByAdministrator();
19  }
20  if (user.role == "zooKeeper") {
21    return dataSyncByZooKeeper();
22  }
23
24  warn("DataSync returs empty for role " + user.role);
25  return [];
26}
27
28function dataSyncByAdministrator() {
29  return [
30    createDataSyncElement("user", getUsers()),
31  ];
32}
33
34function dataSyncByZooKeeper() {
35  return [
36    createDataSyncElement("bird", getBirds()),
37  ];
38}
Client side script change, /mobile/DataChange.scolvo
This script contains the event invoked when a data change arrives from Backend. Here you can decide what to do with the received information, how the client has to react to that. Usually we check the table name and the operation, and based on that, we can execute or skip data handling. This is the place where you can include the logic for reactive behavior. For our example, we simply save the received bird table changes, and refresh the lists on the UI, if needed (we expect that Birds page is already defined with relevant refresh function refreshBirdList):
 1import {
 2  /mobile/SessionUser,
 3  /mobile/bird/Birds
 4}
 5
 6function onDataChangeDg(originId) {
 7  debug("Data change message arrived ...");
 8  if (getCurrentUser() == null) {
 9    return null;
10  }
11  var changeset = $IN.changeset;
12  var typeDefinition = $IN.typeDefinition;
13  debug("Data change message arrive with type definition: " + typeDefinition + ", size is: " + changeset.size());
14  if (typeDefinition == "bird") {
15    changeset.each(function(dao) {
16      if (dao.changeType == "INSERT") {
17        insertOrReplaceTypeDefinition(typeDefinition, dao);
18      } else if (dao.changeType == "UPDATE") {
19        updateTypeDefinition(typeDefinition, dao.id, dao);
20      } else {
21        deleteTypeDefinition(typeDefinition, dao.id);
22      }
23    });
24    refreshBirdList(originId);
25  }
26}
Environment operation
Different phases of the development requires different actions to be executed in the environment. Consider following hints:
Running state only required when you want to use admin view or mobile view.
Changes (database schema, script) in admin (mhub) and mobile scripts require only a logout-login process.
Changes in the Backend database schema or scripts require Backend restart, or environment restart.
Usage of admin and mobile views require created user and logged-in in the environment. You can use Admin view for user creation.
Following cases are described in detail below:
Start, stop and restart
Backend restart
Login to admin view
Login to web view to debug mobile scripts
Creating new user
Resetting the environment
Start, stop and restart
Note
Be aware that the environment uses different ports operate, what have to be free when starting an environment.
Following ports are used by a local environment:
80, 443 for proxy component,
5671, 5672, 15672 for mq component,
13306 for authdb component,
23306 for bedb component
Make sure that these ports are free, and the Docker Desktop is running before the VS Code is started.
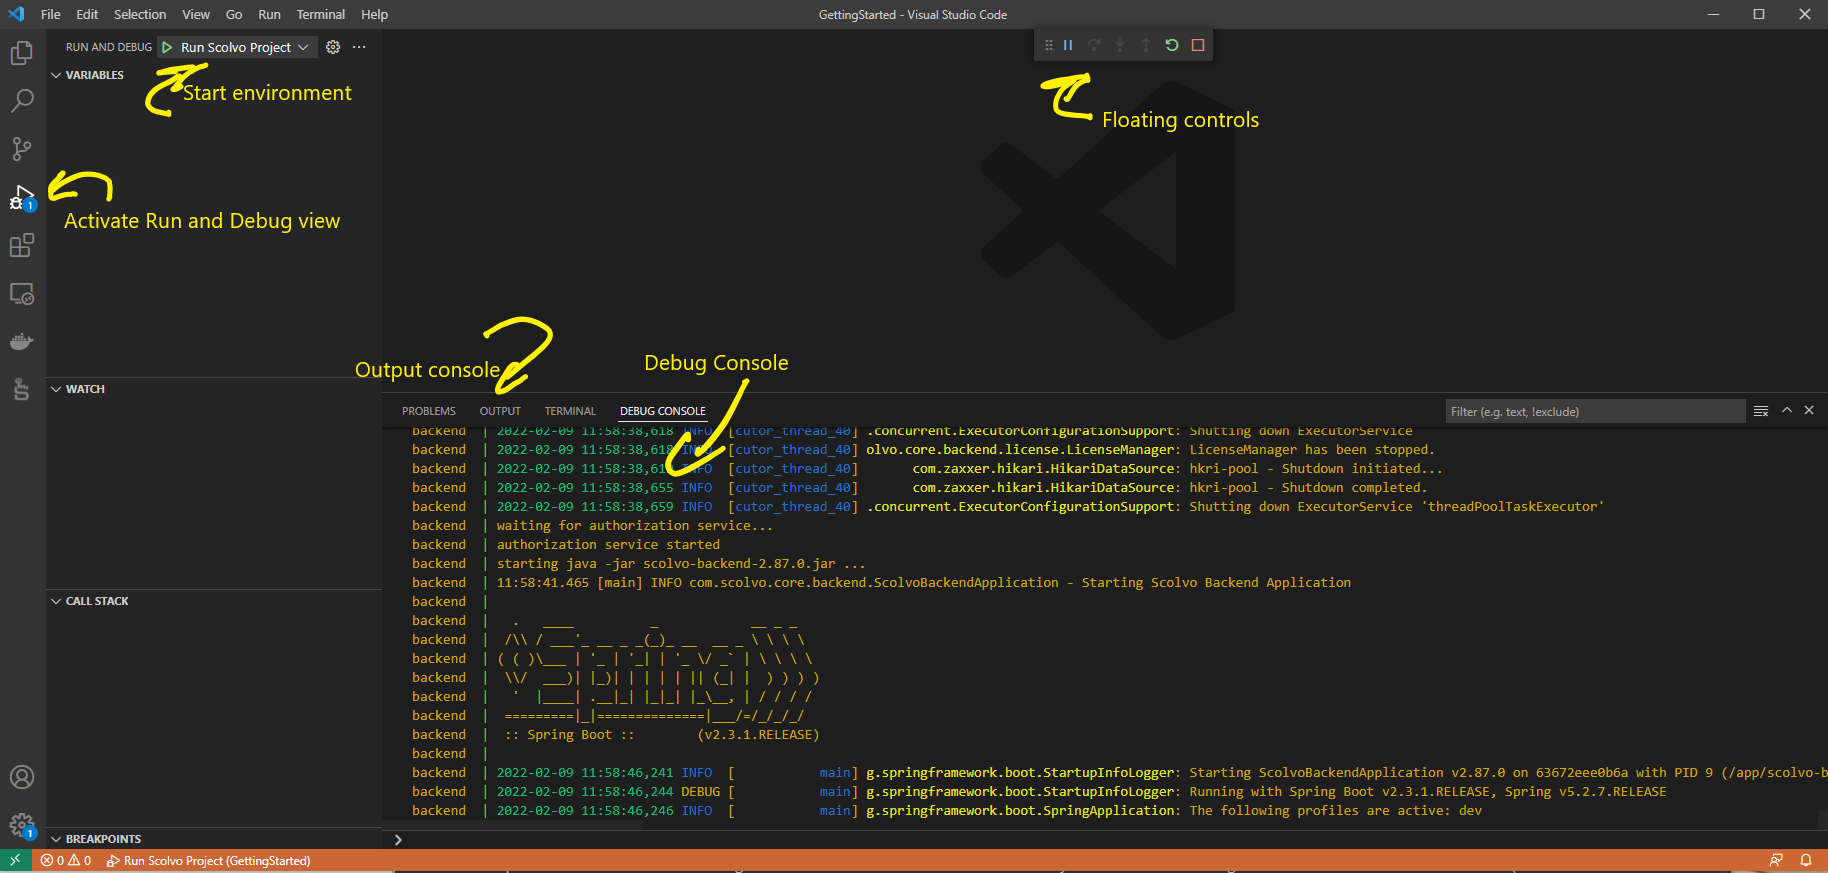
The Scolvo VS Code Extension supports all necessary operations to be able to start, stop or restart the environment. You can use the Run and Debug view to do that:
The extension checks for running images, and if the same environment is running, then it attaches the log and controlling panel.
If the environment is not started yet, you can use Start Debugging button of Run and Debug view to start the environment. Relevant log lines are listed in Output view at first, and later in the Debug Console. The console shows log lines for Backend, Admin and Webapp (compatible with a mobile client) components.
Using the floating control panel of the Run and Debug view the environment can be stopped/started or restarted any time.
If the Run and Debug view is not in synch with the running state of the environment images, then the Docker Extension view can be used to stop the environment and get a synchronized state again (so you are able to use the Run and Debug view correctly again).
Backend restart
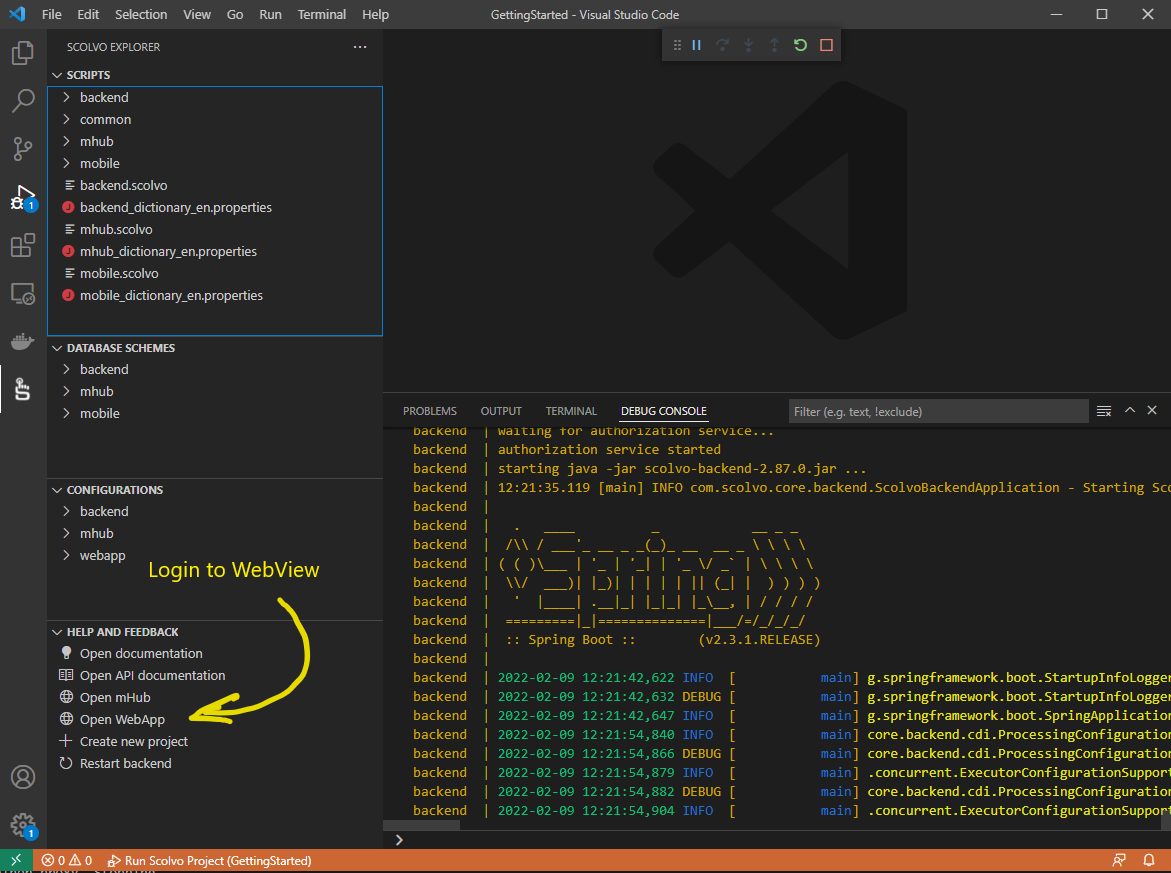
Changes in the Backend database schema or scripts require Backend restart (restart of the whole environment is suitable too). A dedicated quick link with name Restart backend can be found in the Scolvo view’s Help and Feedback section performing the required action. There is no need to logout/login to the existing sessions, when the Backend is running again, then the usage can be continued smoothly. (If the change is in the data synchronization part, then a logout/login is required anyway.)

Login to Admin view
When testing changes in the Admin part (under mhub folder) of the scripts, it is required to login to an Admin session. A dedicated quick link with name Open Admin can be found in the Scolvo view’s Help and Feedback section performing the required action.

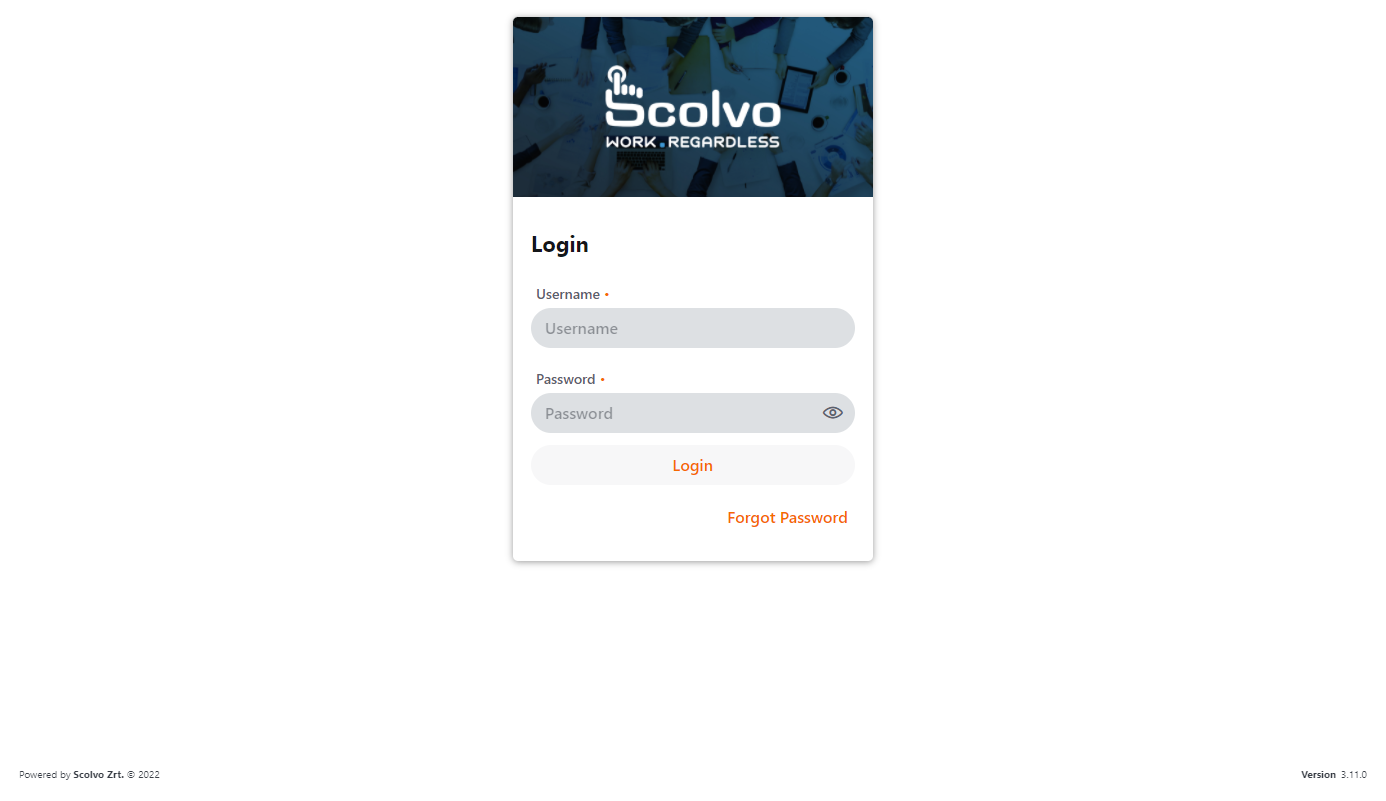
This opens a new tab with the login screen in the default browser of your OS (Chrome and Firefox browsers are supported). An existing user of the local environment (created beforehand) is required. After successful login, the menu structure and default page is displayed according to the script content.
Login to web view to debug mobile scripts
As the mobile apps are too complex to use them locally, the web view represents their functionality while implementing the project. When testing changes in the Mobile part (under mobile folder) of the scripts, it is required to login to a WebApp session. A dedicated quick link with name Open WebApp can be found in the Scolvo view’s Help and Feedback section performing the required action.
This opens a new tab with the login screen in the default browser of your OS (Chrome and Firefox browsers are supported). An existing user of the local environment (created beforehand) is required. After successful login, the menu structure and default page is displayed according to the script content.
Creating new user
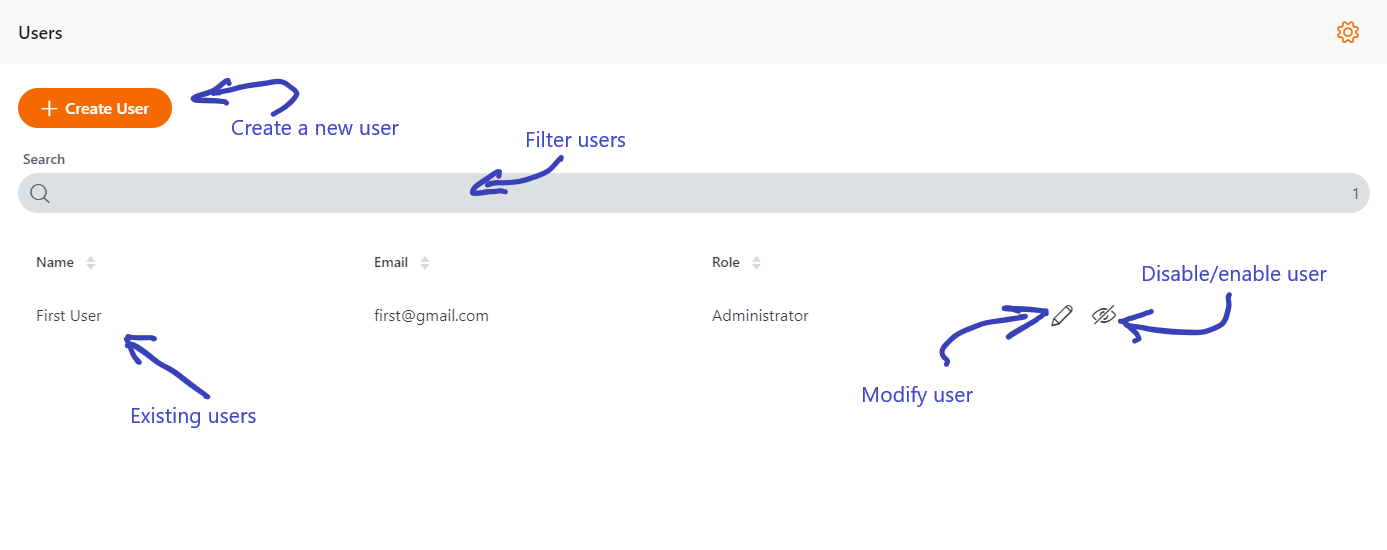
Local user accounts are required to be able to login to Admin and WebApp sessions. A new user can be registered using Admin scripts and default super administrator user credentials (username/password is su/su). After successful login the default page is the Users page, where the existing users of the environment are listed. Here you can create, modify, disable and enable users. The relevant scripts are under the mhub/users folder and in the common/Roles.scolvo script where the logic and roles in your environment can be updated according to your needs.
Resetting the environment
The state of the local environment might become unusable due to radical database structure or logical change needing to wipe out the whole environment and start with a fresh new. For these cases we can use the Reset environment operation. This can be invoked by opening the VS Code command palette and filter for Scolvo keyword and finally activate Reset scolvo project command. It is advised to stop the environment before resetting it.
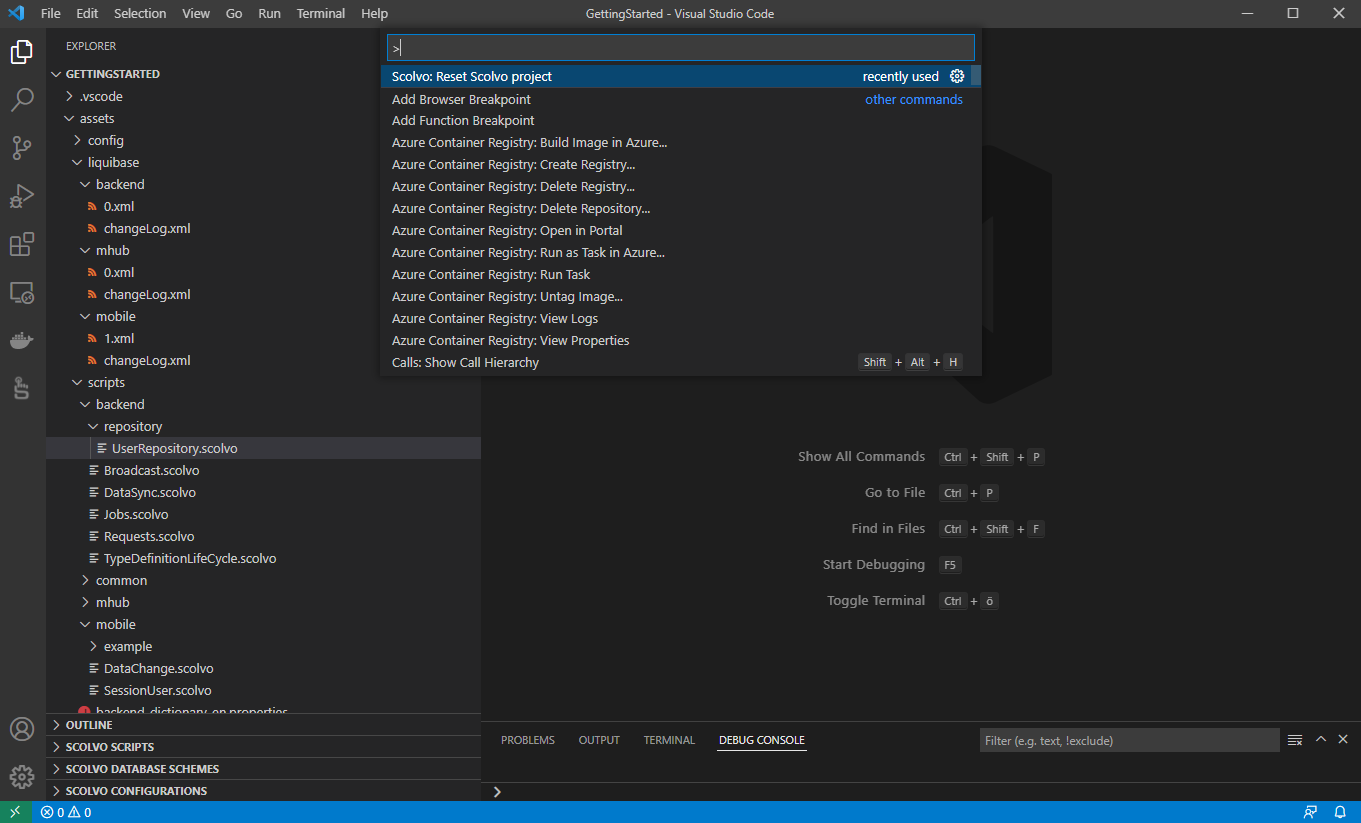
This command removes the container instances, so after starting the environment, a brand-new environment is set up.